Tic-Tac-Toe with React, Redux, Rust - Part 1
Background
This originally started as a toy project that I have created to explore Web Assembly and Rust, with the goal of deepening my understanding of how they can be incorporated into a web application.
I was quite pleased with the final outcome, seeing how I have put into practice the valuable lessons and concepts that I have gained over the years, which would have been greatly beneficial to my younger self when I first started coding.
We’ve all wished for someone to look over our shoulder, point out what could be improved and show us how to do it better, but such guidance is often hard to come by. Hence I have decided to document my thoughts and share my experience in a blog post, and I hope those who are striving to improve will find something helpful to take away from my experience.
Introduction
As Lao Tzu puts it, "A journey of a thousand miles begins with a single step." For many, myself included, Tic-Tac-Toe was that very first step that set everything in motion. It was one of the first games I played on a computer, and one of the first games I wrote when I began my programming journey.
React honours that tradition with its official Tic-Tac-Toe tutorial, introducing beginners to core concepts through building a simple Tic-Tac-Toe game. If you’re new to React, I recommend completing the official tutorial first.
In this blog post, I will build upon that foundation and share ideas on how you can further improve your Tic-Tac-Toe game.
Source Code and Live Demo
The full project source code and live demo are available in the links below:
Why Redux?
I prefer to keep the game state and game logic decoupled from React components, and Redux excels at this by centralising state management.
This approach allows components to access and update state independently, without relying on prop drilling or direct communication between components, which promotes cleaner separation of concerns and makes the codebase easier to maintain and scale, even as the application and game logic becomes more complex.
By managing state and logic outside the UI layer, Redux also simplifies testing and debugging, ensuring that components remain focused on rendering and user interaction while the business logic is handled predictably through actions and reducers.
Setting up a new React and Redux Project
First, let's create a new React project using the official Redux with TypeScript template for Vite, with the following command.
$ npx degit reduxjs/redux-templates/packages/vite-template-redux react-appOnce it's done with cloning the template, you can cd in the new directory and run it with $ npm install && npm start
If you are on macOS with devcontainer, and the page isn't loading in your browser, it might be due to Vite listening on only the IPv6 address (::1) and docker doesn't support IPv6 networking on macOS (at time of writing).
To fix this, you can set the server host address to "127.0.0.1" in vite.config.ts, to force it to listen on the IPv4 localhost address (127.0.0.1).
  server: {
    host: '127.0.0.1'
  },
Or alternatively you can start it with "npm start -- --host" to listen on all addresses, including LAN and public addresses.
Installing Shadcn UI
For this project, I will be using Shadcn UI together with Tailwind CSS for styling. If you want to follow along, you can refer to the Installation Guide for Vite.
Note that I am just sharing some tips and ideas here, so there's no need to follow everything I do exactly. Different strokes for different folks, feel free to adapt or change them as you see fit.
Setting up the pages
There are only 2 pages, one for the main menu and one for the game page. So to keep things simple, I will skip React Router and handle navigation with simple conditional rendering. Here's what the App.tsx looks like:
import type { JSX } from "react"
import { MainMenu } from "@/features/tic-tac-toe/pages/MainMenu"
import { GamePage } from "@/features/tic-tac-toe/pages/GamePage"

export const App = (): JSX.Element => (
  <>{true ? <MainMenu /> : <GamePage />}</>
)
For a quick refresher: I am wrapping the return value in an empty JSX tag <></> (shorthand for Fragment) instead of a <div> to avoid adding an unnecessary parent div element to the DOM.
Within the tag, I use the conditional (ternary) operator to determine which page gets rendered. To check if it's working properly, you can manually change the boolean value and see if the right page gets rendered.
Redux (Classic) vs Redux Toolkit
Before we dive into writing Redux code, I want to clarify that there are two main ways you will see Redux used: the classic Redux approach and the modern Redux Toolkit. As a result, you might encounter different code styles and patterns online.
So don’t be confused — Redux Toolkit is now the officially recommended way to write Redux code, and that's what we are using here.
Classic Redux guides are around, mainly as references to help developers understand the underlying concepts and mechanics of Redux, but for most new projects, Redux Toolkit offers a more streamlined development experience, encapsulating best practices, reducing boilerplate and making code easier to write and maintain.
Implementing page navigation with Redux
Game status definition
We will begin by defining the three possible game status:
-
Main Menu: Gives player(s) the option to play against the bot or challenge each other on the same screen.
-
Game Started: Indicates that the game is in progress, with players taking turns and making moves.
-
Game Ended: Indicates that the game is over, providing options for players to restart or return to the main menu.
Creating the Redux slice
With the game status defined, we can now proceed to create the Redux slice. A "slice" is a collection of Redux reducer logic and actions for a single feature in the app. Here's how the Tic-Tac-Toe slice looks like:
import { createAppSlice } from "@/app/createAppSlice"

export enum GameStatus {
  MainMenu,
  GameStarted,
  GameEnded,
}

export type TicTacToeSliceState = {
  gameStatus: GameStatus
}

const initialState: TicTacToeSliceState = {
  gameStatus: GameStatus.MainMenu,
}

export const ticTacToeSlice = createAppSlice({
  name: "ticTacToe",
  initialState,
  reducers: create => ({
    startGame: create.reducer(state => {
      state.gameStatus = GameStatus.GameStarted
    }),
    exitGame: create.reducer(() => {
      return initialState
    }),
  }),
  selectors: {
    selectGameStatus: state => state.gameStatus,
  },
})

export const { startGame, exitGame } = ticTacToeSlice.actions
export const { selectGameStatus } = ticTacToeSlice.selectors
Starting from the top, the code defines an enum called GameStatus, which represents the possible status of the game that was defined earlier.
Next, the type declaration that outlines the structure of the slice state, specifying the properties and it's types.
The initial state is then defined as a constant, providing default values for each property in the state.
Following that, within the app slice, you’ll find both reducers and selectors functions:
- Reducers are functions that specify how the slice's state should change in response to specific actions.
- Selectors are functions that extract specific pieces of data from the Redux state.
Actions (reducers) and selectors are then exported to make them accessible to React components.
With the new slice created, the next step is to add it to the root reducer in the app store configuration file (src/app/store.ts).
I kept the original template slices in place for reference, but feel free to remove them if you don't need them.
const rootReducer = combineSlices(counterSlice, quotesApiSlice, ticTacToeSlice)Using the selectors and reducers
Now let's take a look at how the selectors and reducers can be used in the components to transition between pages.
Here's the updated App.tsx, using the selector to access state data:
...
import { useAppSelector } from "@/app/hooks"
import {
  GameStatus,
  selectGameStatus,
} from "@/features/tic-tac-toe/ticTacToeSlice"

export const App = (): JSX.Element => {
  const gameStatus = useAppSelector(selectGameStatus)
  return <>{gameStatus === GameStatus.MainMenu ? <MainMenu /> : <GamePage />}</>
}
And here's the main menu page, using the dispatch function to trigger the reducer to update the state data:
import type { JSX } from "react"
import { useAppDispatch } from "@/app/hooks"
import { Button } from "@/components/ui/button"
import { startGame } from "../ticTacToeSlice"

export const MainMenu = (): JSX.Element => {
  const dispatch = useAppDispatch()
  return (
    <div className="flex flex-col items-center justify-center min-h-svh gap-y-2">
      <Button onClick={() => dispatch(startGame())}>Practice with Bot</Button>
      <Button onClick={() => dispatch(startGame())}>Local Two Player Mode</Button>
    </div>
  )
}
As you can see, adopting Redux is quite straightforward. Centralised state management not only simplifies your workflow but also keeps the codebase organised and maintainable.
Passing arguments to reducers
Let's see how we can pass arguments to reducers, to finish up the main menu buttons. We will start by introducing player type (human and bot) to the slice state.
export enum PlayerType {
  Human,
  Bot,
}

export type Player = {
  id: number
  name: string
  playerType: PlayerType
}

export type TicTacToeSliceState = {
  gameStatus: GameStatus
  players: Player[]
}

const initialState: TicTacToeSliceState = {
  gameStatus: GameStatus.MainMenu,
  players: [],
}
In Redux Toolkit, reducers receive parameters through the action.payload property. The payload can be any data type — such as a string, number, object, or array — depending on what your application needs.
For the updated startGame reducer, I am using Player[] as the payload.
startGame: create.reducer(
  (state, action: PayloadAction<Player[]>) => {
    state.gameStatus = GameStatus.GameStarted
    state.players = action.payload
  },
),
If you need to pass multiple parameters to your reducer, you can bundle them together by creating a custom payload object.
After updating the reducer, let’s modify the main menu buttons to pass in the required parameters. In the example below, I am using hardcoded values for simplicity. You can, of course, create additional UI elements to let players customise these options, but for this blog post, I will keep it simple.
const handlePracticeWithBotClick = () => {
  dispatch(startGame([
    {
      id: 0,
      name: 'You',
      playerType: PlayerType.Human,
    },
    {
      id: 1,
      name: 'Bot',
      playerType: PlayerType.Bot,
    },
  ]))
}
Looks good so far, but how can we verify that the state is updating correctly without introducing additional code?
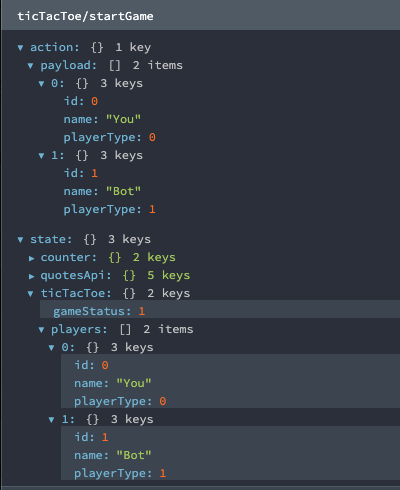
Redux DevTools Browser Extension
We can use Redux DevTools to inspect the application state in real-time. Refer to the official installation guide for instructions.
Here's a screenshot of it in action:
I have covered quite a bit so far, and I will pause here and continue with the next steps in the following post.
- ← Previous
Blog Refresh 2025 - Next →
Tic-Tac-Toe with React, Redux, Rust - Part 2