Tic-Tac-Toe with React, Redux, Rust - Part 3
Bot Opponent
There are various ways to implement a bot opponent, with varying levels of difficulty and play styles. For now, we will keep things straightforward and implement a basic bot that selects its moves at random.
Simple Bot Opponent that plays a random move
To implement a bot that plays randomly, we first need to generate a list of all available legal moves, and then have the bot select one at random to play.
We will begin by implementing new functions (getLegalMoves and getRandomMove) in the game logic file.
export function getRandomElement<T>(arr: T[]): T | undefined {
  if (arr.length === 0) return undefined
  const index = Math.floor(Math.random() * arr.length)
  return arr[index]
}

export function getLegalMoves(bitboards: number[]): number[] {
  const bitboard: number = mergeWithBitwiseOr(bitboards)
  const legalMoves: number[] = []/
  for (let pos = 0; pos < NUMBER_OF_SQUARES; pos++) {
    if (((bitboard >> pos) & 1) === 0) {
      legalMoves.push(pos)
    }
  }
  return legalMoves
}

export function getRandomMove(bitboards: number[]): number {
  const legalMoves = getLegalMoves(bitboards)
  return getRandomElement(legalMoves) ?? 0
}
With the random move generation logic in place, we can now incorporate it into the game. We will utilise an asynchronous thunk function, to handle the process of generating and dispatching a random move.
A thunk is basically "a piece of code that does some delayed work". For Redux specifically, "thunks" are a pattern of writing functions with logic inside that can interact with a Redux store's dispatch and getState methods.
Async thunks perform operations asynchronously, allowing the application to remain responsive and non-blocking. I won't be going into the details of createAsyncThunk here, if you need further explanation, refer to the documentation page.
Here's the thunk code for the slice file:
...
import { createAsyncThunk, type PayloadAction } from "@reduxjs/toolkit/react"
import type { RootState } from "@/app/store"

function getRandomMove(bitboards: number[]) {
  return new Promise(resolve => {
    setTimeout(() => {
      const move = gameLogic.getRandomMove(bitboards)
      resolve(move)
    }, 1500)
  })
}

export const playBotMove = createAsyncThunk(
  "ticTacToe/playBotMove",
  async (_arg, { dispatch, getState }) => {
    const state = getState() as RootState
    const move = await getRandomMove(state.ticTacToe.bitboards)
    dispatch(
      playMove({
        position: move,
        playerType: PlayerType.Bot,
      }),
    )
  },
)
In this implementation, we use the setTimeout() method to introduce a delay, simulating the bot's "thinking" process. The actual operation of generating a random move is instantaneous and does not inherently cause any delay or performance slowdown; the pause is purely for effect.
As shown above, the getRandomMove function returns a Promise that resolves after a 1.5-second delay, providing a randomly selected move as its result.
The async thunk playBotMove utilises the getRandomMove function to generate a random move, and then dispatches the previously defined playMove action to execute it.
To trigger the thunk from the game page component, I use the useEffect hook to track changes in the players' turn. Whenever it's the bot's turn, I dispatch the playBotMove action. This ensures the bot acts automatically when it's its turn, keeping the game flow seamless. The updated code is shown below:
...
import { useEffect, useState, type JSX } from "react"
import type { Player } from "../ticTacToeSlice"
import {
  ...
  getBotMove,
  PlayerType,
  playMove,
} from "../ticTacToeSlice"

export const GamePage = (): JSX.Element => {
  ...
  const activePlayer: Player = useAppSelector(state =>
    selectActivePlayer(state),
  )
  const [isBotThinking, setIsBotThinking] = useState(false)

  ...

  // get and play bot's move
  useEffect(() => {
    if (activePlayer.playerType === PlayerType.Bot) {
      setIsBotThinking(true)

      void dispatch(playBotMove())
        .unwrap()
        .then(move => {
          setIsBotThinking(false)
        })
    }
  }, [activePlayer.playerType, dispatch])

  return (
    <div className="flex flex-col items-center justify-center min-h-svh">
      {isBotThinking ? (
        <div className="py-2 text-gray-800">Bot is thinking</div>
      ) : (
        <div className="py-2 text-gray-800">{getTurnText()}</div>
      )}
      ...
    </div>
  )
}
I have also updated the UI to indicate that the bot is thinking when it's the bot's turn. The isBotThinking state is managed locally within the component, as it is only responsible for controlling visual feedback and does not influence the core game logic.
We now have a fully functional game with a bot opponent that makes random moves. However, playing against a bot that selects moves at random quickly becomes boring. Can we make the bot play smarter and provide a greater challenge?
Web Assembly
When developing more complex games, implementing advanced bot algorithms can become computationally expensive. To optimise performance, leveraging WebAssembly (Wasm) is a highly effective solution.
WebAssembly allows running code at near-native speed directly in the browser, which is significantly faster than traditional JavaScript execution. This performance boost is particularly valuable for resource-intensive tasks such as AI logic, pathfinding, and real-time decision-making in complex games.
Instead of rewriting the entire game in WebAssembly, we can selectively migrate only the performance-critical components, such as the bot’s algorithm into WebAssembly. This targeted approach allows us to significantly improve execution speed without the need for a time-consuming full rewrite.
Web Assembly with Rust
For this section, I have chosen Rust because it’s a modern language that’s gaining popularity, and this is the perfect opportunity to get some hands-on experience.
To compile Rust programs to WebAssembly, you will need the following:
Setting up the Rust Wasm project
Once you have the toolchain setup, you can clone the project template with this command:
cargo generate --git https://github.com/rustwasm/wasm-pack-templateI have chosen "wasm-tic-tac-toe" as the project name and am organising it as a monorepo. Here’s what the directory structure looks like:
.
├── react-app
└── wasm-tic-tac-toe
For a quick initial check to ensure everything is working as expected, build the Rust project with:
$ wasm-pack buildNext, add the "wasm-tic-tac-toe" package as a dependency for the React project, and run npm install.
"dependencies": {
...
"wasm-tic-tac-toe": "file:../wasm-tic-tac-toe/pkg"
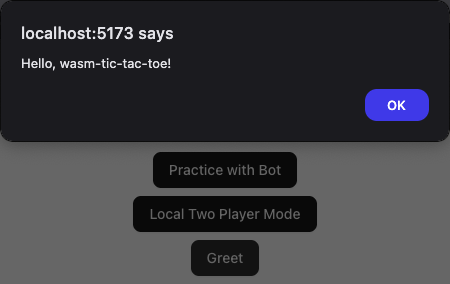
},To quickly test the web assembly integration, add a button to the main menu page and have it call the prewritten greet function when it’s clicked. If everything is working correctly, you should see an alert box appear.
import * as wasm from "wasm-tic-tac-toe"

<Button onClick={wasm.greet}>Greet</Button>
Unfortunately, something appears to have gone wrong, and instead we are greeted by an error message.
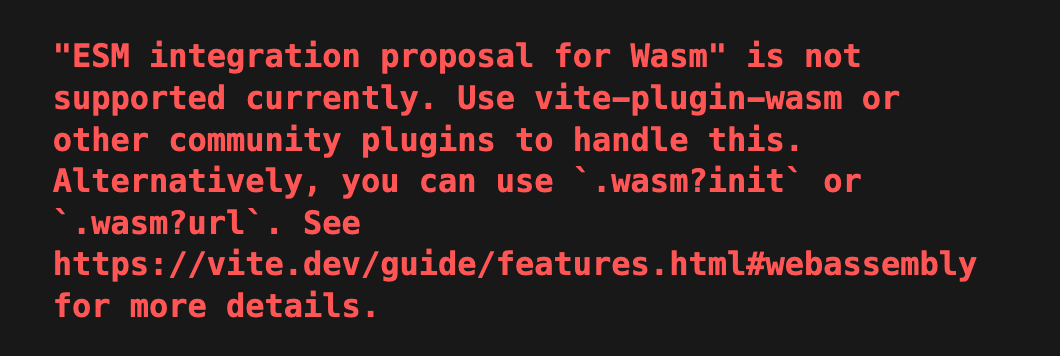
Let's try to fix that by installing vite-plugin-wasm and also vite-plugin-top-level-await (for older browsers).
$ npm install vite-plugin-wasm vite-plugin-top-level-awaitAfter installing the packages, we will update the vite.config.ts file to include them.
import wasm from "vite-plugin-wasm"
import topLevelAwait from "vite-plugin-top-level-await"

export default defineConfig({
  plugins: [
    ...
    wasm(),
    topLevelAwait()
  ],
It should now work correctly, and you will see the alert box appear when you click the button.
Implementing a Get Move function with Rust
With the integration between React and Rust up and running, we can now focus on writing more Rust code.
Let’s start with the simplest implementation: selecting the first available move, we don't even need a random number generator for this.
#[wasm_bindgen]
pub fn get_first_available_move(bitboard1: u16, bitboard2: u16) -> u8 {
    for pos in 0..9 {
        let mask = 1 << pos;
        if (bitboard1 & mask) == 0 && (bitboard2 & mask) == 0 {
            return pos;
        }
    }
    0
}
Next, add the following function to the game logic file. This step is optional, you can also call wasm functions directly from the thunk.
export function getFirstAvailableMoveWasm(bitboards: number[]): number {
  return wasm.get_first_available_move(bitboards[0], bitboards[1])
}
I prefer having a layered approach, where each layer interacts only with its adjacent layers, with the game logic file acting as an abstraction layer for Wasm functions. A clear separation of concerns makes the codebase easier to understand, maintain and update.
Wasm <-> Game Logic <-> Slice <-> Components
Finally, let's update the slice file. (For brevity, I am leaving out the Promise and setTimeout here, but feel free to include them if you wish.)
export const playBotMove = createAsyncThunk(
  "ticTacToe/playBotMove",
  (_arg, { dispatch, getState }) => {
    const state = getState() as RootState
    dispatch(
      playMove({
        position: gameLogic.getFirstAvailableMove(state.ticTacToe.bitboards),
        playerType: PlayerType.Bot,
      }),
    )
  },
)
It doesn’t get any simpler than this — with just a few straightforward steps, we have shifted the move generation logic into Rust.
Monte Carlo tree search
With the overall code structure in place, we can now focus on improving the bot's algorithm. Let's use a proper algorithm that provides a better challenge for players.
Instead of implementing the typical Tic-Tac-Toe Minimax algorithm, let's experiment with something different, the Monte Carlo tree search. This cutting-edge algorithm has powered advanced AI systems like AlphaGo and has been applied to a range of complex games and decision-making problems.
MCTS uses a probabilistic, sampling-based approach to explore the game tree by running numerous random simulations from each position. Unlike traditional algorithms, it does not require specialised knowledge or an evaluation function for the game or problem domain. It only needs to know the legal moves and end conditions, making it highly adaptable and easily reusable across a wide range of games and applications.
MCTS excels in environments with high branching factors—such as Go or complex strategy games—where traditional search methods like minimax or alpha-beta pruning become computationally infeasible.
You might be thinking, "That sounds like a huge undertaking and could take a lot of time." Instead of building everything from scratch, let’s take a practical, real-world approach by leveraging existing libraries to accelerate development and increase efficiency.
mcts-rs
There's a Rust implementation of the Monte Carlo Tree Search (MCTS) algorithm available, mcts-rs. and even better, it includes a Tic-Tac-Toe example — exactly what we need.
The example code looks easy to adapt — we can incorporate most of it as is and tweak it slightly to align with our project.
Adding the crate to the project
Let's add the crate to the project, then try building it to check for any errors.
$ cargo add mcts-rs
$ wasm-pack build
Of course, things don’t always go as smoothly as we would like. Sometimes, unexpected issues arise — let’s take a closer look at what’s causing the problem and try to fix it.

According to the documentation in the provided link, we have to enable the js Cargo feature to make it work with wasm-pack. Let's proceed to do that now.
Add the following to the dependencies section in the Cargo.toml file and then run $ wasm-pack build.
[dependencies]
getrandom = { version = "0.2", features = ["js"] }
The build has completed successfully once again. We are now ready to introduce the Monte Carlo Tree Search (MCTS) algorithm to the project.
Adapting the example code
We will begin by copying the entire file (excluding the main function which we do not need) into the lib.rs.
Though it has a slightly different implementation, representing moves as x, y coordinates instead of using the position indices, we can still use the code as it is. We only need to convert the moves into position indices when passing it to the React project.
While it's simple to modify the code to use position indices, I am leaving it as-is to minimise code changes. However, you can modify it if you prefer.
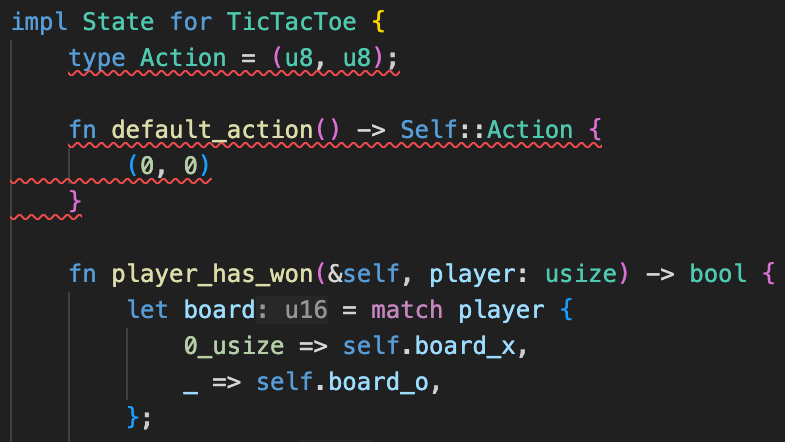
Here are examples of code changes needed, from
pub struct TicTacToe {
  ...
  legal_actions: Vec<(u8, u8)>,
}

fn default_action() -> Self::Action {
  (0, 0)
}

set_bit(&mut new_board_x, action.0 * 3 + action.1);

actions.push((pos / 3, pos % 3));
To
pub struct TicTacToe {
  ...
  legal_actions: Vec<u8>,
}

fn default_action() -> Self::Action {
  0
}

set_bit(&mut new_board_x, action);

actions.push(pos);
Next, let's try compiling the code. Unfortunately, some errors have been detected involving the State trait (a trait in Rust is similar to an interface in TypeScript).
It appears that the example code includes an additional type (Action) and function (default_action) that are not defined in the State trait.
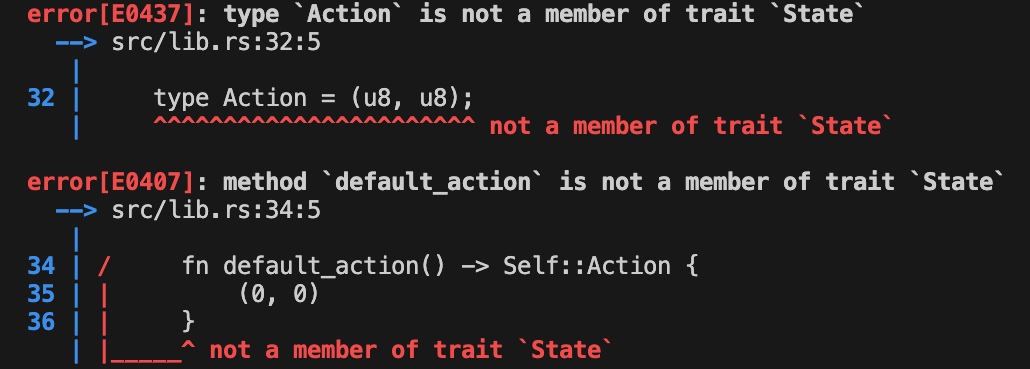
That’s odd. Let’s compare our project's state.rs file with the one from the GitHub repository where we sourced the example code.
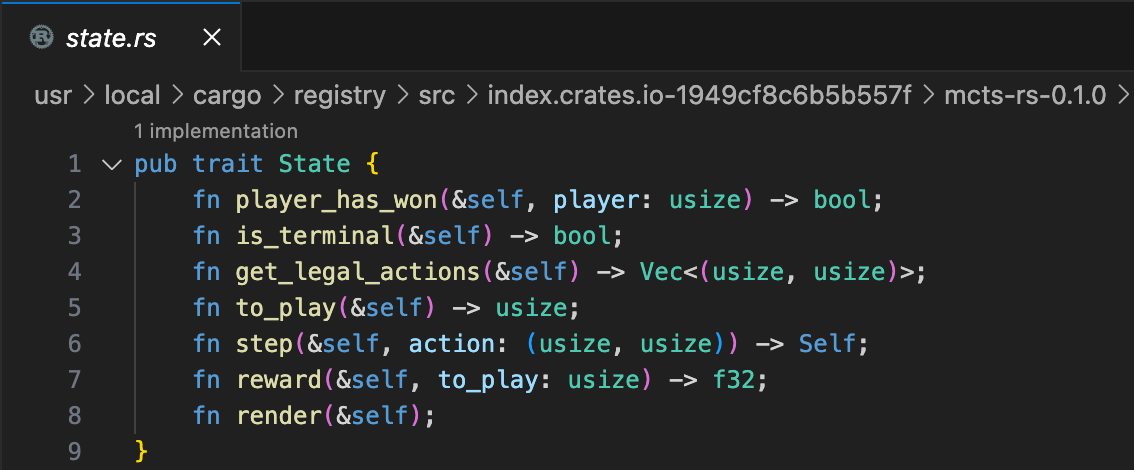
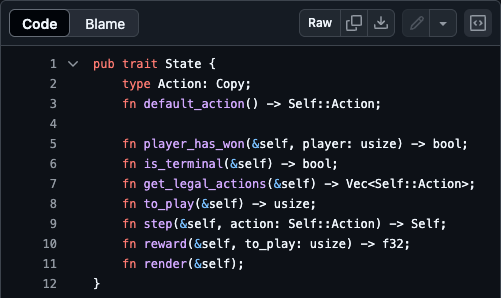
Both files look different. Even though they specified the same version (v0.1.0) in Cargo.toml, the version on GitHub is actually newer.
It looks like the issue is simply a version mismatch, which is not a major problem. To resolve it, we just need to ensure the example code uses the correct crate version. Since I prefer to work with the latest version, I will pull the crate directly from GitHub.
Update the Cargo.toml file, and run $ cargo update.
#mcts-rs = "0.1.0"
mcts-rs = { git = "https://github.com/PaytonWebber/mcts-rs.git", rev = "c9d879aee17829f852507477e13d8a6848cdccf7" }
I am pinning the dependency to a specific Git commit ID because no version tag exists for the latest (at time of writing) code.
Everything should be working correctly now. We can proceed to implement the function that returns the move generated by MCTS.
#[wasm_bindgen]
pub fn get_mcts_move(board_x: u16, board_o: u16, current_player: usize) -> u8 {
    let game = TicTacToe {
        board_x,
        board_o,
        current_player,
        legal_actions: determine_legal_actions(board_x, board_o),
    };

    let mut mcts = Mcts::new(game.clone(), 0.5);
    let action = mcts.search(10000);
    return action.0 * 3 + action.1;
}
Next, create an additional function in the game logic file that wraps the Wasm function, providing a clean abstraction layer for its usage.
export function getMctsMoveWasm(
  bitboard1: number,
  bitboard2: number,
  currentPlayer: number,
): number {
  return wasm.get_mcts_move(bitboard1, bitboard2, currentPlayer)
}
And finally update the thunk to use the new MCTS algorithm.
function getMctsMove(
  bitboard0: number,
  bitboard1: number,
  currentPlayer: number,
): Promise<number> {
  return new Promise(resolve => {
    setTimeout(() => {
      const move = gameLogic.getMctsMoveWasm(
        bitboard0,
        bitboard1,
        currentPlayer,
      )
      resolve(move)
    }, 1500)
  })
}

export const playBotMove = createAsyncThunk(
  "ticTacToe/playBotMove",
  async (_arg, { dispatch, getState }) => {
    const state = getState() as RootState
    const { bitboards } = state.ticTacToe
    dispatch(
      playMove({
        position: await getMctsMove(
          bitboards[0],
          bitboards[1],
          selectActivePlayerId(state),
        ),
        playerType: PlayerType.Bot,
      }),
    )
  },
)
Your bot is now equipped with the MCTS algorithm, ready to be put to the test.
Go ahead — build it, run it, and see how it performs.
Next steps?
Congratulations on building your very own Tic-Tac-Toe game, combining the power of React, Redux, and Rust. Give yourself a round of applause! 🎉
So what's next? Remember, a journey of a thousand miles begins with a single step, and there are still many areas for you to explore and improve upon.
If you want to dive deeper into Rust and WebAssembly, check out the free The Rust Wasm Book. It covers rendering directly to HTML canvas directly from WebAssembly memory.
I hope you picked up something useful from this post. Thanks for reading, and see you next time!
- ← Previous
Tic-Tac-Toe with React, Redux, Rust - Part 2