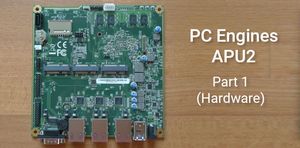
Comprehensive Guide to PC Engines APU2 - Part 1 (Hardware)
Update 2021: No longer recommended due to shortage. https://www.pcengines.ch/leadtime.htm "Due to an extended shortage for the NICs used on our boards, we will not be able to make regular deliveries in the next few months. The lead time for new NIC orders is quoted around 52 weeks."
Introduction
PC Engines APU2 is an excellent piece of hardware for building a small firewall, suitable for home users or small businesses. It is powered by a silent, passively cooled x86-64 processor, from the AMD Embedded G series, the GX-412TC (1 GHz quad Jaguar core with 64 bit and AES-NI support). Power consumption is very low at around 6W to 10W depending on usage.
It comes in various models, allowing you to choose either 2 or 4 GB DDR3-1333 DRAM, and from 2 to 4 Intel Gigabit Ethernet ports.
It has a SD card slot as well as a mSATA slot. Regular SATA SSD and HDD can also be attached via a custom SATA power/data cable which can be purchased separately.
Best of all, it uses an open source firmware/bios, coreboot. For those truly paranoid who prefer to build everything yourself from the source code, you can easily do so. Instructions will be covered in Part 2 of this guide to make this seemingly intimidating step more accessible to anyone who wants to dabble in it.
The firmware is not yet 100% open source and still contains some binary blobs from AMD, but this is another topic that is out of scope for this guide.
PC Engines is a Swiss company and these boards are made in Taiwan. Overall, it's a very affordable board with a price range between US$86 and US$120 depending on model.
Why I Wrote This Guide
Because it's not a turnkey, off-the-shelf product, and requires some familiarity working with both hardware and software, the target audience is restricted to the power users who have the technical expertise and experience to figure things out themselves.
Also, unlike conventional boards, it doesn't come with any graphics ports, and requires a serial connection to access the console. This can be a little intimidating for those who are new to headless devices.
Even for those who are technically proficient, it can still be quite time consuming, having to read through all the information available which are all over the place, as well as troubleshooting and dealing with the unforeseen issues which can end up becoming a time sink, requiring tedious trial and error to make things work.
However, I believe it can be a fairly straightforward process, even for those much less experienced but keen to explore, if everything is documented more comprehensively.
Therefore, I felt compelled to write a comprehensive walkthrough guide to address these issues. Here, I will cover the complete step-by-step instructions, from start to finish, to get an OPNsense firewall up and running, as well as highlighting potential pitfalls to avoid.
There will be knowledge gaps when dealing with stuff for the first time. Hopefully this guide can plug those gaps, expedite the building process and make it a smooth, enjoyable and successful experience, especially for those who are building their first standalone open source firewall from scratch.
Finally, if you have any suggestions for improvements, do let me know.
Purchasing Guide
The very first step is to figure out what you need and place an order. For this, I will only be covering direct purchase from the official store.
The Official Store
There are 3 different order form pages, in different currencies and meant for different regions. Use the USD form if you are not from Switzerland and Europe. Their base prices are in USD, so prices in other currencies might fluctuate depending on the current exchange rate.
Note that they do not sell directly to EU private customers due to the complexity of the separate registration and recycling schemes for each of the 28+ EU member jurisdictions, so if you are from the EU, you have to buy from a distributor instead. The list of distributors can be found in the shop page.
The order forms are processed manually, and the reason given is that international shipping is too complicated for their website to estimate in advance.
Here's how ordering works, first you fill in the order form and submit your order, You will then receive an automated email acknowledgement asking you to wait for the full invoice that includes the shipping cost to be sent to you before you make payment. For reference, mine was submitted on Saturday and I received the invoice on Tuesday. Check your spam folder if you think you are not getting a reply.
Once your order has been processed successfully, you will receive the invoice together with the payment page link. So follow the instructions and make payment. After your payment is confirmed, your order will be shipped, and you will receive another email saying your order was shipped which also contains the tracking number.
They also provide the option to dropship certain items from their suppliers in Taiwan and China, with a discount for savings on incoming freight and handling. I have not tried this option, so check with them if this works better for you.
Here are the official FAQ about ordering and shipping
https://pcengines.ch/howorder.htm
APU2 Board
As stated earlier, the APU2 comes in various models. The APU2, APU3 and APU4 are just different variation categories that fall under the APU2 platform, which is the latest generation of boards, at the time of writing.
I recommend going for 4GB RAM because the RAM is soldered therefore can't be upgraded, and it doesn't cost much more anyway. The recommended requirements for OPNsense is also 4GB RAM.
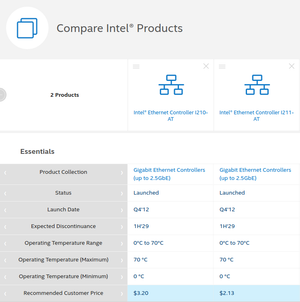
For the ethernet controllers, some claim that I210-AT is better than I211-AT. While I haven't dug into the nitty-gritty details or did any benchmarking to verify it, I did found out that I210-AT cost about a dollar more than I211-AT. Refer to screenshot below, which was extracted from this comparison page.
Case
Unless you are getting your own custom case or cooling system, you should get the official case, which comes in a few different colours. The case serves an important purpose, it helps cool the CPU by conducting heat away.
Driver bit for DB9 / D-sub connector hex nuts
You will need to remove the hex nuts from the serial port before you can fit the board into the case.
So this official driver bit is one option. Another option is to use a plier of suitable size.
Or if you want to avoid this altogether, you can opt for the pre-assembly service.
Heat spreader placement template for apu2/3/4
Will recommend getting this if you want a dummy-proof way to stick the heat spreader. Otherwise, this is optional because the heat spreader is much bigger than the processor so there is adequate leeway and doesn't require such absolute precision
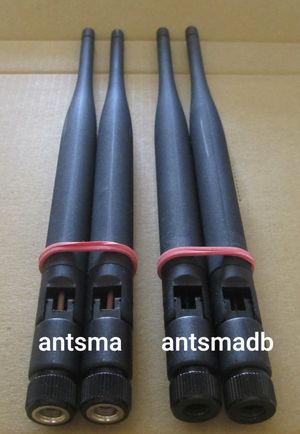
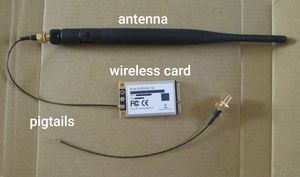
Wireless
For compatibility information about WiFi and other mPCIe modules, you can refer to this page, https://github.com/pcengines/apu2-documentation/blob/master/docs/mpcie_modules.md
I did not buy this because I want to minimise the attack surface. I will update this section when I get some to test.
Update: Have bought some and will write more about it when I can find time. So only photos for now.
AC adapter
You can't power on your board without this, so you will need this. Or you can also find your own suitable alternative based on the specifications provided.
Adapter USB to DB9F serial with USB cable
You will need a serial cable to connect to your board from a computer, so get this if you don't have one yet.
It's hard to find a computer with a serial port these days while USB is everywhere, so getting a serial to usb cable is a more versatile choice than a regular serial cable.
The adapter comes with a 1.5m detachable USB to Micro USB cable (A to Micro-B), so you can replace it with a longer one if you need to.
Choice of Storage Media
Compatibility
The original firmware that comes with the board is very outdated (2017) and doesn't support USB 3.0 thumb drives, so you will need to flash it to the latest version first, before you can use the newer thumb drives.
You can use either a USB 2.0 thumb drive or a supported SD card to boot into an OS that can update the firmware.
Some SD cards might not work, so if you are planning to boot into it via SD card, and not using the one from the official store, I recommend that you have some different ones with you, especially older ones, just in case you need them.
Even with the latest firmware, my SanDisk Extreme U3 MicroSD card still doesn't work, although my other SanDisk Ultra U1 MicroSD cards do work.
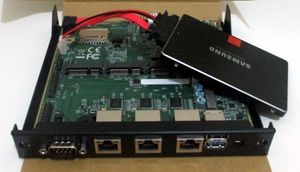
mSATA SSD
SSD is the preferred choice and if you want to use a SSD drive that can fit into the official case, you will have to use a mSATA SSD. You can get it from the official store or hunt for one elsewhere if you want a more recognised brand.
There is only one mSATA slot, and the other two mini PCI express slots look identical, so check the label on the board to make sure you got the right one, it's the one closest to the battery.
SATA SSD
I tried connecting a regular 2.5" SATA SSD drive with the official SATA power/data cable and found that there is no way to fit it within the case, as shown in the image below.
SD Card
SD Card is another workable choice, and it's easily available everywhere.
It's not the ideal choice due to it's more limited write cycle. To address this, OPNsense has an embedded mode which stores logs and cache data only in the RAM disk, which can help prolong the lifespan of the SD card.
USB Thumb Drives
When using the external USB 3.0 ports, I wasn't able to boot into OPNsense consistently. I tried different thumb drives from USB 2.0 to USB 3.2, and quite often, I get read errors when booting. Sometimes, it works after many resets, but usually it doesn't.
The only way to get USB thumb drives to work reliably is to use the internal USB 2.0 headers. To do so, you can get a USB 2.0, 9 Pin Header to Dual Type A Female cable adapter, as shown in image below.

Also, there is still an outstanding issue with the latest firmware, "certain USB 3.x sticks happen to not appear in boot menu". I haven't encountered this issue so far, with my drives which are mostly from SanDisk. This is just for reference, not saying SanDisk sticks work flawlessly, I still get the problems mentioned earlier.
Some extra information from official docs, https://github.com/pcengines/apu2-documentation/blob/master/docs/debug/usb-tests.md
Assembly Guide
Official Assembly Instructions
Unofficial Assembly Guide Video on YouTube
The two links above pretty much cover the whole assembly process, so I will just add some supplementary notes here, based on my personal experience, instead of replicating another step-by-step guide.
Battery
This board uses a LR44 battery. When you get the board, the battery should be just half-slotted in and disconnected. So push it all the way in if you want to start using it.
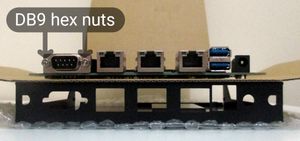
DB9 hex nuts
It is easy to overlook this, but this is one of the most important steps. These are the two nuts on the serial port and if you didn't remove them, the board will not fit into the case.
So if you are pushing the board into the case but it just couldn't get in, check the nuts, make sure they are removed.
As per normal, clockwise to tighten, anticlockwise to loosen.
I wasn't able to loosen the hex nuts by hand, so here are some possible options,
-
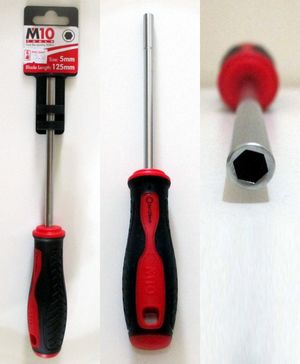
Order the hexbit/driver bit for DB9 from the official store.
-
Purchase a third party 3/16” hex nut driver to unscrew them the proper way. This can be very tricky because most nut drivers have a fat rim which means the diameter is too big and will be obstructed by the connector.
It is best to bring along your board if you are purchasing it physically, to make sure that it's able to fit in correctly.
Your best bet lies in microelectronics stores, those from hardware stores are very likely to have fat rims.
Here's how a compatible nut driver looks like, it's from Sun Light Electronic Pte Ltd at Sim Lim Tower in Singapore. It's manufactured by M10 Tools.
-
You can also use a plier of suitable size to loosen it.
-
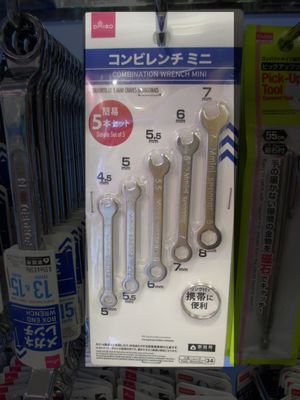
Daiso Mini Wrench Set
If you have a Daiso near you, this mini wrench set from Daiso works pretty well. The 5mm C-shaped head fits perfectly. Just a small turn, anticlockwise, to loosen it, and it can be unscrewed by hand.
I think this is among the cheapest options, it costs just SGD $2 here in Singapore. Daiso also sells small pliers.
Screwing the board
There are 4 screws, one for each corner to secure the board to the case. The two screw holes nearest to the back of the case are partially blocked, so if you have fat or clumsy fingers, using a screwdriver with a magnetic tip will make your life much easier.
If you have nimble fingers, using a screwdriver with a magnetic tip can also make your life much easier.
Next steps
Once the board is secured to the case, you are ready to move on to the next part. You can leave the top of the case open for easy access to the internal slots.